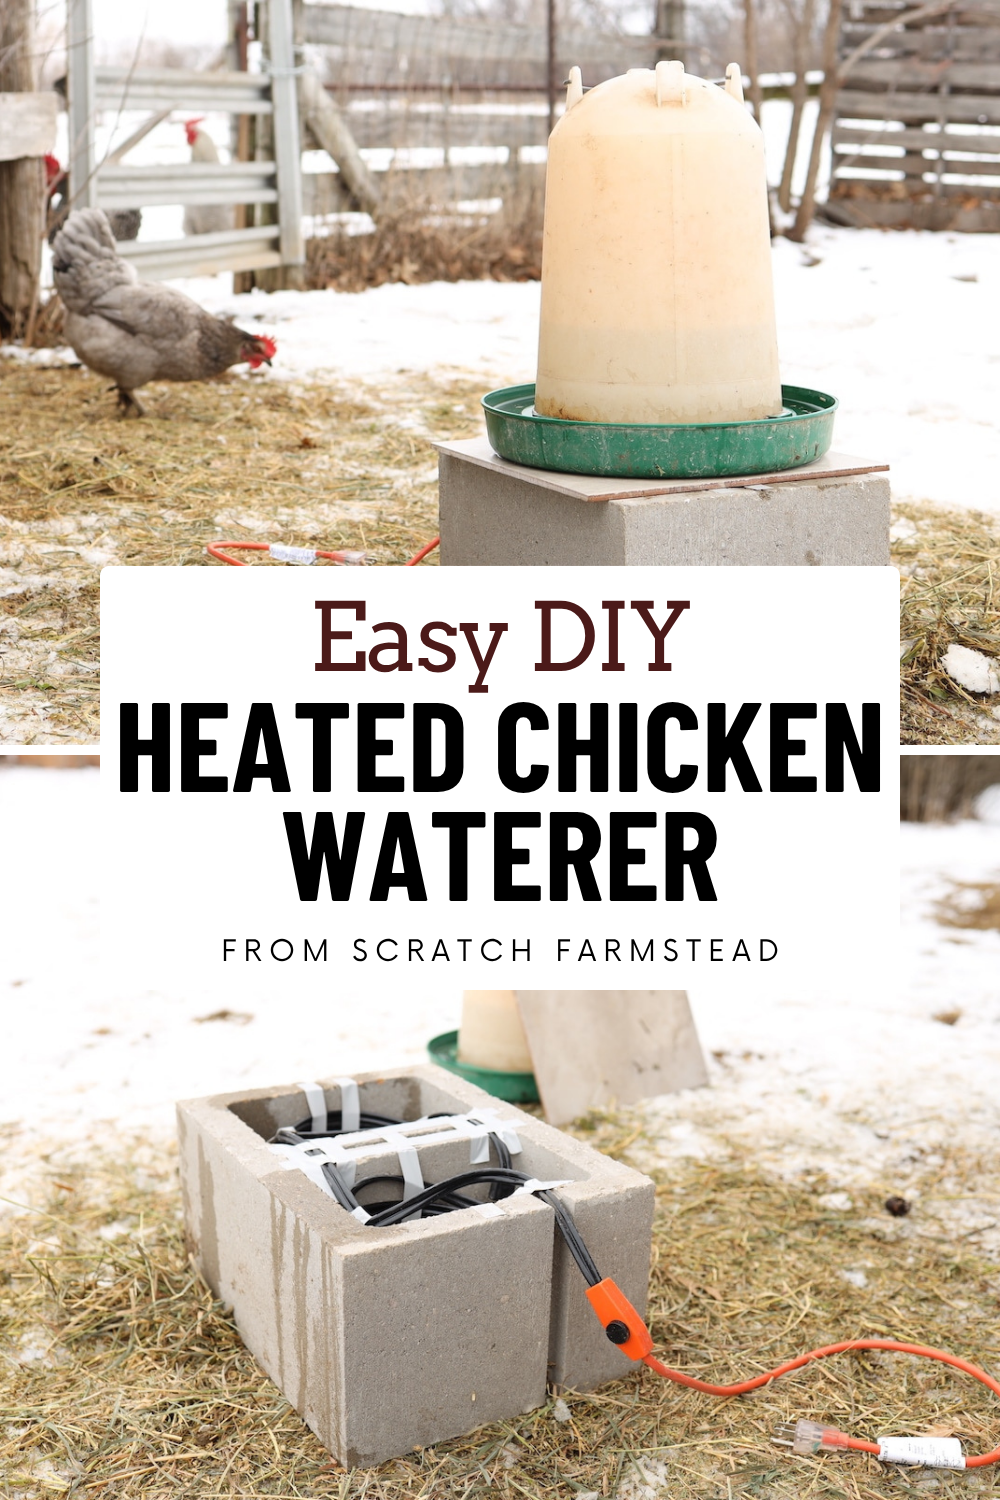
If you’re looking for a reliable, worry-free water source for your flock this winter, this easy do-it-yourself heated chicken waterer is it. Make it in just 10-15 minutes. Use your existing waterer. It’s simple and it works.
Your chickens will love it and you will love not having to worry about frozen water in the dead of winter.
Coming Up With The Design
We live in northern Illinois and can have some pretty extreme winters. I knew I was going to need something reliable and I wanted to be ready for our first winter on our new 5-acre homestead.
So, I went out to my local Farm n Fleet and picked up a heated chicken waterer base for $40. The box told me they wouldn’t guarantee it to work unless you bought their double-walled metal waterer with it. All in, the total was over $100 with tax.
Yikes! I knew I could do better.
So, I returned both items, got my money back, did a little research, and came up with a fool-proof heated chicken waterer DIY project that is super simple.

Why I don’t recommend a heated waterer with a light bulb
Back when we lived in the suburbs and kept backyard chickens, I built a different style of heated chicken waterer base that you commonly see. It’s a large cookie tin with a lightbulb socket and incandescent bulb as the heat source inside the tin.
There were a lot of Pros—everyone has an old cookie tin lying around and it’s pretty simple and cheap to rig up a socket for a 40-watt bulb inside of one.
However, what it didn’t account for is moisture. Water spills. Rain and snow. General moisture from chicken doo-doo. Moisture creeps into your cookie tin over time and incandescent bulbs just don’t hold up to moisture. I found myself replacing bulbs monthly, if not weekly.
Climbing into a tight coop in 0-degree weather trying to pop open a frozen cookie tin is not fun! We now have a larger coop in our barn and I needed something our 40+ birds can rely on.
No light bulbs. No aquarium heater and 5-gallon bucket. I just needed a basic design that would work with our existing plastic waterer.
What makes this the best heated chicken waterer design?
First off, it’s easy. If projects aren’t your thing, you CAN build this! The steps are simple, it doesn’t require a lot of tools, and it will only take about 10-15 minutes to build.
I also believe in replaceable parts. If a product or brand doesn’t have replaceable parts for what they sell I generally won’t support it. That’s a big reason why I returned the waterer from the store. When the heating element goes bad, which it will, I don’t like the idea of tossing the entire thing and starting over when only one part went bad.
Plus, you can use your existing waterer! As long as your base is big enough to fit your waterer on top, your chicken’s water will stay thawed.
This heated chicken waterer base will cost less than $35 and I use very basic, readily available materials that can all be swapped out quickly and easily.
What I Used To Build The Heated Base
12’ Electric Heat Cable (~$28) – These flexible heat elements can be found in the plumbing department of your local hardware store and are relatively affordable, or buy it here. This one came with a built-in thermostat. The thermostat turns on the heating element automatically when there is a risk of water freezing. This is a fantastic feature so you don’t need to worry about wasting energy or turning your waterer on and off constantly. A 12’ cable has worked fine inside our coop here in northern Illinois, but if you need more heat, simply get a longer heat cable for only a few dollars more.
Note: This installation does go against the manufacturer’s recommended installation guidelines to not have the heat cable coiled or touching itself. I have not had issues with the cable overheating but you should read the instructions yourself before making. This alternative heat cable ensures it will not short or burn out when overlapped, but it does not have a built-in thermostat.
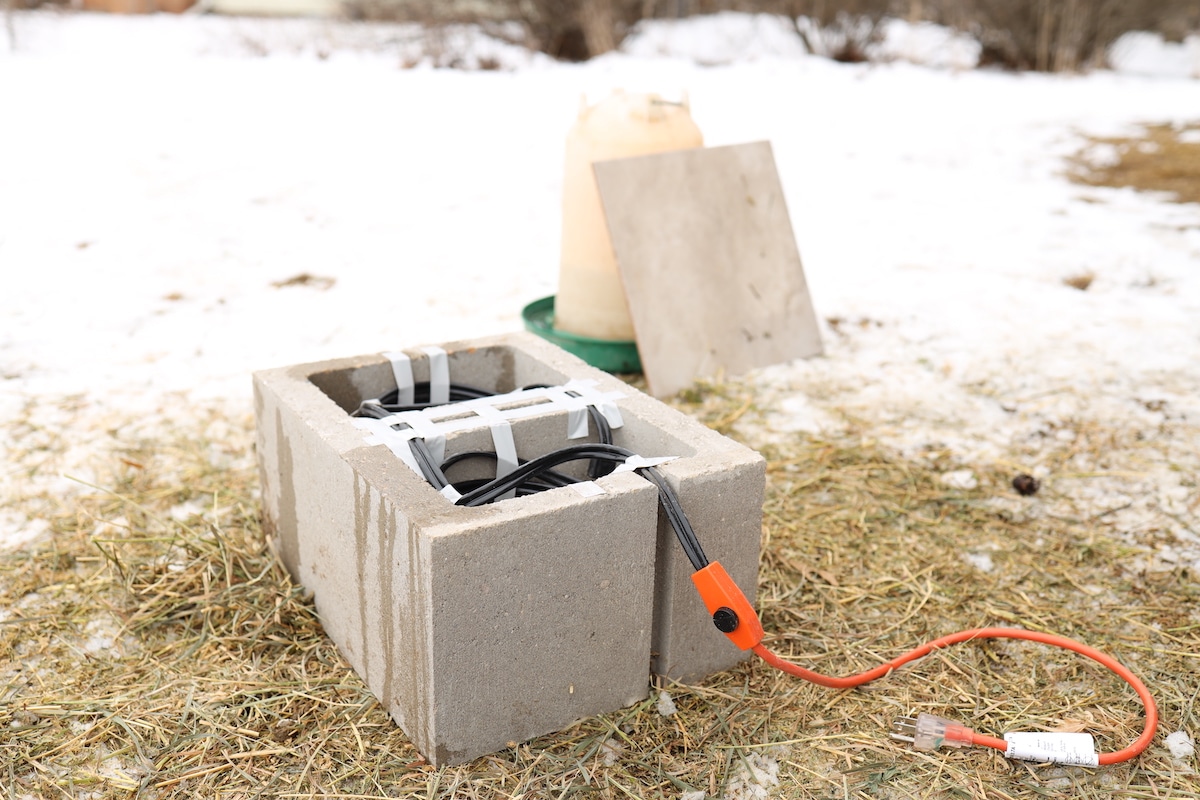
Concrete Block (~$2) – I used a 12” x 16” concrete block (or CMU) that is 8” high. You want a sturdy base under your waterer and something heavy enough that your chickens won’t knock over. Concrete is also a great insulator, so it traps a lot of heat within the hollow chambers of the block. I did purchase this one but I am also a big fan of reusing, and concrete blocks are something you can almost always find for free on Craigslist or Marketplace.
Tile (~$1) – I used one, 13-1/2” x 13-1/2” flooring tile. Your tile needs to accomplish two things: 1) Be large enough to fully cover the chambers of the concrete block to trap heat, and 2) Be thin enough to effectively transfer heat. They sell thin concrete blocks that would have fit nicely and certainly been more robust. But they are over an inch thick and I wasn’t sure heat would transfer well through them. Go with the tile. Mine has held up well and always stays plenty warm.
Electrical Tape (or Duct Tape) – You probably already have some on hand. But if not, pick up a roll of electrical tape or duct tape.
Extension Cord – If you don’t have a power supply in your coop, grab a spare extension cord and run it to your coop.
Thermostat Alternative – Some heat tapes don’t come with a built-in thermostat. In this case, you can buy a super handy plug called a Thermo Cube which has the same effect. In fact, going this route would probably have been my preference if my local hardware store carried just a basic heat cable. It’s cheaper to buy one without a thermostat and generally, it’s the electric heating element that goes bad over time and not the thermostat.
Tools List:
– Angle Grinder w/ Masonry Grinding Blade (or a hammer and masonry chisel)
– Safety Glasses
– Scissors or Knife (for cutting electrical tape)
– Pencil
Step-by-step Guide to Building Your Heated Waterer Base
Step One
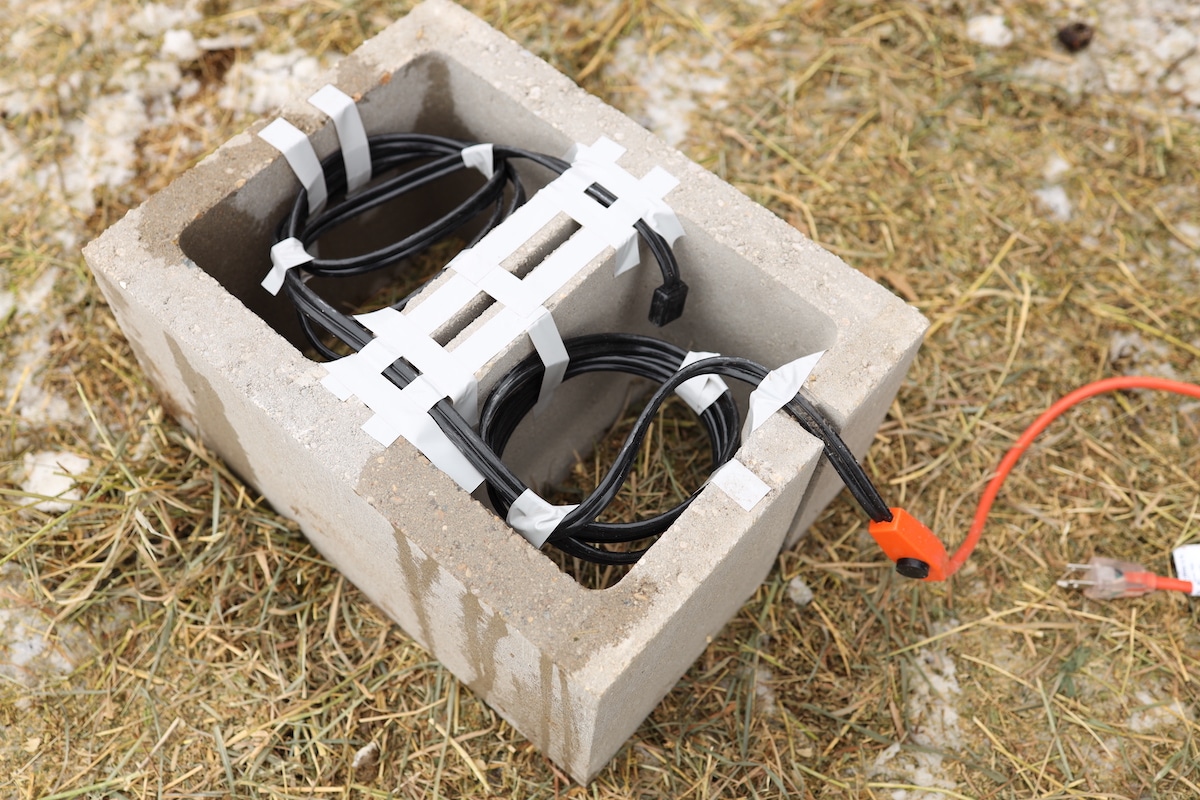
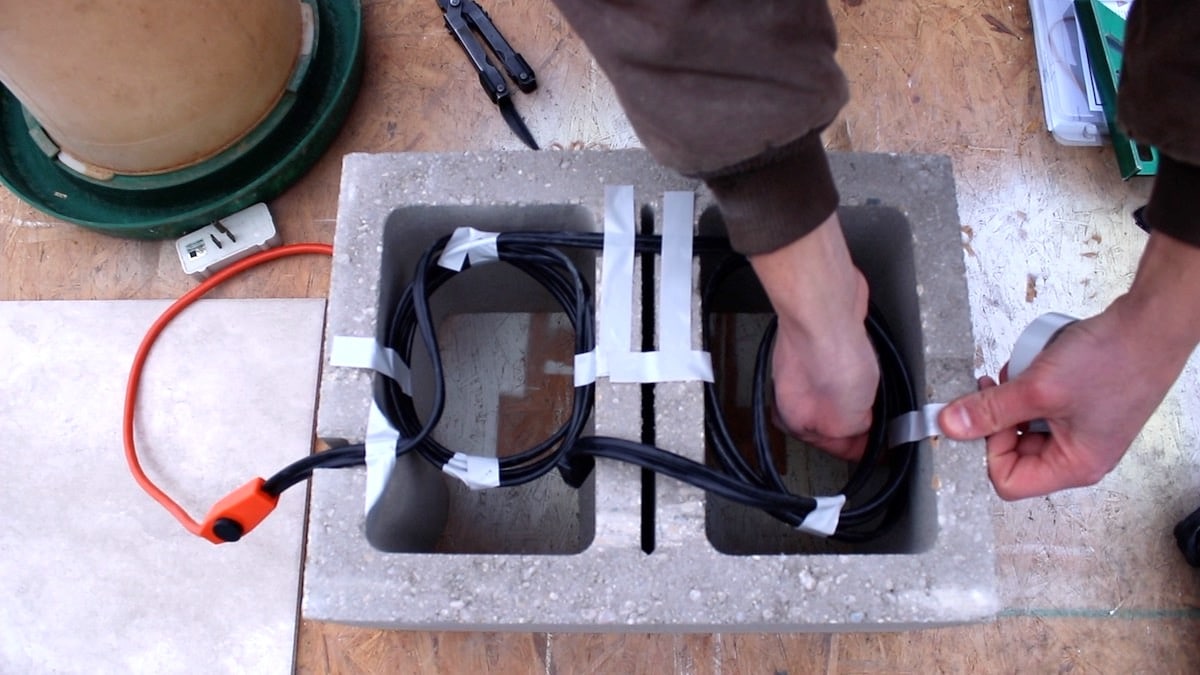
Mark out where you want your heat cable to enter the block. With an angle grinder and masonry grinding blade (wear safety glasses while using), grind a notch at your mark large enough for the heat tape to sit in so the tile can lay flush on top of the block. Next, make two similar notches on top of the center divider between the two chambers. These notches allow your heat cable to transfer from one chamber to the other and also help hold the heat tape in place.
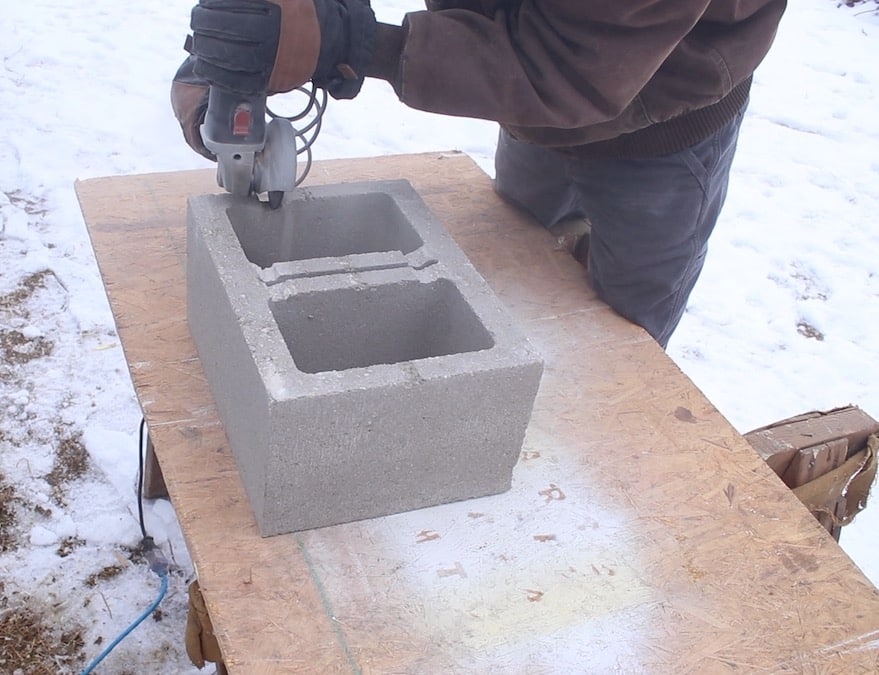
Note – If you don’t have an angle grinder, no worries! Grab a hammer and a chisel and you can chisel out notches. It might take a little extra time and not be as precise, but your chickens will never know the difference!
Step Two
Run your heat cable through the entry notch and tape it in place. Make sure the thermostat hangs outside the block about 6-8” so that it can get accurate readings. Coil up about half the tape in the first chamber and tape the coil so it holds together. Then tape it to the block so it stays near the top. Bring your heat cable to the other chamber through one of your center notches, coil up and tape the rest. I left a tail at the end of the second coil to bring through my second center notch. Apply as much tape as needed at the end to hold it all in place.

Step Three
Place the block in your chicken coop where you want it and make sure it is level.
Step Four
Plug in the tape, put your tile on top making sure the chambers of the block are fully covered, and place your chicken waterer on top.

That’s it!
We couldn’t be happier with the results. Our diy waterer has now lasted us four winters. Even during multiple days of sub-zero temperatures during the winter months, we’ve woken up to unfrozen, fresh water for our ladies to drink from.
What to do IF water does freeze?
During times of extended extreme cold weather, you may find the frozen water in the trough or chamber of your waterer. In that case, here’s what I do:
1. Check it often. When you stay on top of it, it’s easy to remove any ice to keep water flowing.
2. Chip out ice. Most often ice will start to form in the trough part of your waterer. I have a garden weeding tool with an angled metal hook. This works perfectly to chip away ice.
3. Bring it inside. If ice has built up to the point where it’s no longer flowing, bring your waterer inside, run it under warm water to thaw, re-fill, and your chickens have clean water again!
We’re excited to hear what you think in the comments below and let us know if you have questions.
Some of the above links are affiliate links. This means we earn a small commission on qualifying purchases at no cost to you.
Want more helpful tips for your backyard flock?
- How To Care For Chickens In The Winter Basics
- Breaking Down The Cost of Chickens For Eggs
- What Should Be Inside A Chicken Coop – Easy Guide!
- Predator Proof Chicken Coop Essentials
- How To Care For Baby Chicks
- Simple Outdoor Chicken Brooder Ideas
- Chicken Roost Designs | Two Simple DIY Ladder Perch Ideas
- Custom A-Frame Chicken Tractor For (Almost) Free
Pin it for later!